Stihl MS200 problem

Burnham

Woods walker
Joined
Mar 7, 2005
Messages
23,320
Location
Western Oregon
Today I was buzzing up some limbs and such for the woodpile with my 200 rear handle. After a while, needed fuel and oil plus a small adjustment to tighten the chain.

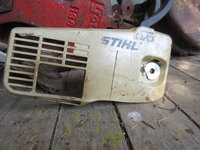
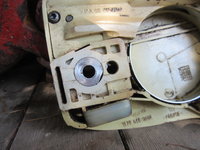
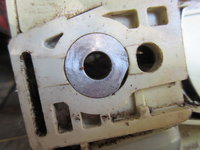
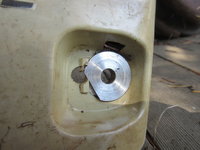
I loosened the bar nut, then as I attempted to insert the scrench into the bar adjuster screwhead I was stymied by a bit of plastic and the edge of the insert. Closer examination showed that the metal insert that the bar stud goes through had spun a bit, tearing some plastic of the clutch cover.

Here's a few pictures.
Stihl MS200 clutch cover 001.JPG Stihl MS200 clutch cover 002.JPG Stihl MS200 clutch cover 003.JPG Stihl MS200 clutch cover 004.JPG
 
  • Thread Starter Thread Starter
  • #2
I was able to turn the insert back into proper position by tightening a C clamp on it to give me a grip. But the plastic is now misshapen, and I rather expect it might want to move again when next I loosen the bar nut.

I can of course replace the cover, it's easily available and not TOO dear. But I wonder if anyone has had this happen with one of these sorts of Stihl, and if anyone has an idea why it happened, and if anyone has a bright idea for getting that insert to stay put now that it's moved once.

Here's how it looks after I reset the insert to proper placement.

Stihl MS200 clutch cover 005.JPG Stihl MS200 clutch cover 006.JPG
 
Idk... looks like a keyway situation, possibly.

A drill press that centered on a very near to the edge of the metal position, that is also drilling the plastic.

Add a drop of epoxy.

Sand it flush.

???
 
  • Thread Starter Thread Starter
  • #4
Might work. Be hard to keep the drill bit evenly in both plastic and metal, as they are so different in density/hardness.
 
I've had that happen...I just made do, repositioned it when it was necessary.
 
Was a common issue with those saws. Typically caused from over tightening the bar nut. Some crews I worked with had that happen to all of their saws, others very rarely. Like Stephen said, live with it until you can't, then replace it.
 
Several factors come into play when determining your course of action, including, but not limited to; your personality, your time availability, and your budget. My dad would spend hours of his time and very little money repairing stuff like that. I, on the other hand, would simply replace it. I suspect you're more like my dad. :)
 
Maybe try shimming it on the back side. I can't tell how much of a gap is there on the pic, but stick a piece of beer can in the keyed part of the slot. If it works, leave til it falls out, then use glue the next time you do it.

edit:
My (likely)final attempt before giving up and buying a new cover would be drilling one or two holes through both the plastic and metal and pinning it with copper pins. Peen it on both sides, then file off flush.
 
Last edited:
I've done the re-position with less gusto tightening the bar from now on, 200t. After reposition, give the plastic time to recover its correct shape. If you have a precise hand, vice the cover into place use a tiny end mill about 1/8 go tiny light slow feed slowww rpm do a partial depth "keyway" cut put a dab of epoxy pee on making a pin. plunge/drill together, think milling machine action, slow and light will keep the parts in place. heavy fast = disaster can't be done. consider it milling the aluminum with the plastic there but negligible, like air,, don't let the part (cover) move at all, if it does you're hosed
 
get out your soldering iron, and do some plastic welding, take a sliver off the cover somewhere else not needed, and then melt in a new piece to replace where it pushed up against and squashed it before.
if its going black, iron is too hot, just put iron next to it, gently move and fold the melted plastic, might have to turn it on and off a few times to get the right temp too, have welded up several cases of non pro models before with success, along with covers cracked etc.


crack from oil pump drive wire/ debrits into plastic
1801.jpg

degreased and cleaned with acetone, worth hitting with some sandpaper too if its badly oxidised.

1802.jpg

welded up.
1803.jpg
 
That's an interesting idea. If it didn't take, I could still try some of the other options offered. Thanks @Trains.
If you can easily press out that bush piece, putting dimples on the inner part of the plastic where the bush goes can help with interference fit and reduce it from slipping in the future, used to do that to wheel bearing hubs using a fine punch, where the outer races had spun, along with loctite, but a few dimples from the soldering iron could also help if its loosing its bite on the interference fit.
 
Al, that's not where the issue is. Maybe read the initial post again?
I'll take the cover off one of my 200t's and see if I can get the big picture .As far as I know it uses the same cover as the rear handled .Which BTW I've never seen a rear handle model .I'm just going on what I found on the IPL .
 
It looks like maybe the alum slug has a flange. If so, drill flange and plastic for a roll pin. like 1/16". Or put a bit of wire or rod in and smash the ends like a rivet. Also remove the alum bush, degrease with acetone, and epoxy the whole thing in. In the future, keep the interface between the nut and bush clean and oiled.
 
  • Thread Starter Thread Starter
  • #22
I agree @davidwyby, it does look to have a flange. You can see it clearly in the third pic posted. I might try your suggestion as well as the plastic "weld". Between the both of them, it should hold. If not, then I get to use the method preferred by @Mellow :D.
 
  • Thread Starter Thread Starter
  • #23
After thinking on it a bit, I decided to do as @davidwyby suggested. It worked out fine, and I'm pretty certain it'll hold. Especially if I take a bit of care not to overtighten the bar nut. It is interesting that the direction the insert moved shows that it was on loosening rather than tightening that it slipped. But it makes perfect sense that the cause is as @SkwerI diagnosed.

I removed the insert easily by tapping it out using a 1/2" socket as a driver. Then drilled the flange with a 5/64" bit, which was ideal to receive the pin I made from a very slightly larger steel brad from on hand supplies. Replaced the insert and drilled through the hole in the flange through the plastic shoulder. I cut the head off the brad with side cutters, the drove it through the drilled hole. Then peened off the cut end smooth and flush, cut off the excess through the plastic side, and filed it flush.

Here's some pictures.

001.JPG 002.JPG 004.JPG 005.JPG 006.JPG 007.JPG 008.JPG 013.JPG 015.JPG 016.JPG
 
Last edited:
Back
Top